

Growing up, my ski coach always used to say “If you don’t plan for it, it won’t happen.”
He wanted us to set goals and lay out a path to reach them. The same sentiment can be applied to building software, except building software is much more of a team sport than skiing. You need to make sure everyone on your team – plus other stakeholders like marketing and support teams – understands what you’re trying to build, why you’re building it, how long you expect it to take, and how the project is tracking towards release.
If your team is geographically distributed, planning and communicating not only becomes more of a challenge, but also more critical to the success of your project. That’s where a centralized release planning page comes in.
I’ll show you how teams at Atlassian plan feature releases using a page on our internal wiki that organizes all the relevant information in a central place that is accessible to the team and anyone else who needs to know what’s going on.
Planning and communicating this way solves a slew of problems all in one go:
- Developers don’t waste time searching for information. Product requirements and designs are collected in one spot, and linked to issues for easy access.
- Exec status meetings are a thing of the past. We get an hour back every week because stakeholders can check on project status themselves.
- Nothing falls through the cracks. The page “remembers” the details so all you have to remember are things like sending your mom flowers on her birthday.
We start with a high-level overview page that serves as a sort of home base, then drill down into specifics on sub pages. Follow these four steps to plan software projects with efficiency and clarity.
Step 1: collect ideas (the “why”)
Every software project, whether a minor feature or a new product launch, includes lots of inputs. We are constantly sharing links to products and designs that inspire us, seeking and sharing customer feedback, using in-product analytics to guide our decisions, and hacking together MVPs. We share and give feedback on all these ideas in our wiki, so we can reference the ideas and the discussions about them whenever we need to. (Since we make Confluence, that’s naturally the wiki tool we use. But you can do this with what ever wiki or intranet tool your team uses.)
When we start planning for a new feature, we collect all the relevant bits of background on a page. The product manager draws from this to help her determine what the problem is we’re solving for customers and why we should solve it. In practice, this page is a mix of her summary of the background research with links to further reading (customer interviews, market research, competitor insights, feature requests, etc.) and a proposal for the feature’s high-level value.
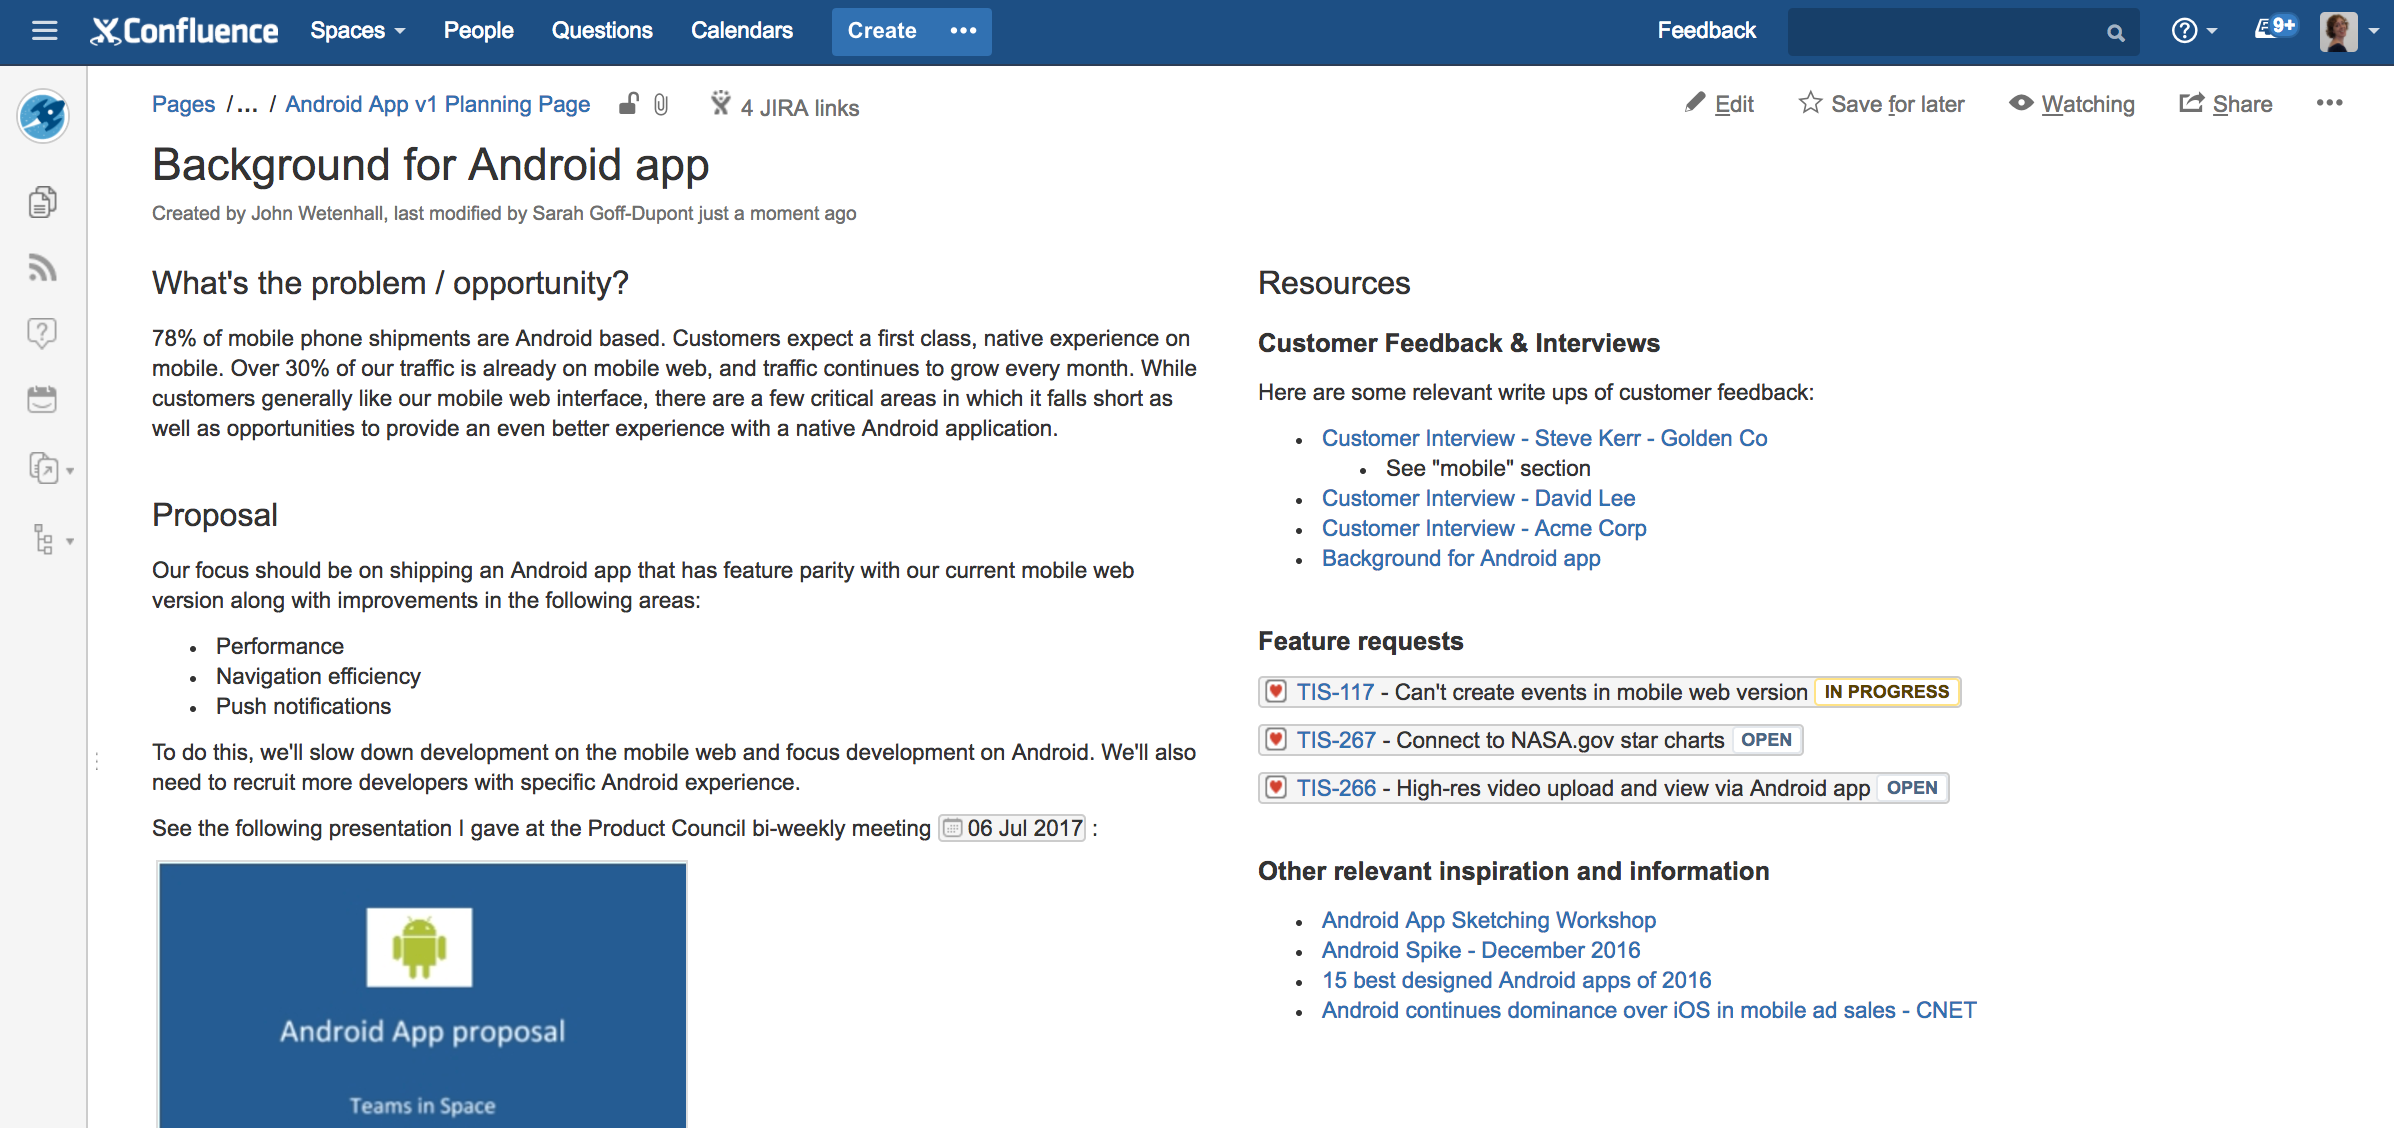
This background page is a child page (i.e., sub-page) of the release planning page, so it’s collected with the rest of the release information, and is automatically linked to at the top of the planning page for quick reference.
The product manager shares this page with her development manager and the rest of the team to give them the necessary foundation – as well as an opportunity to give feedback and test her assumptions and assessment of the problem and the opportunity. It’s a living document, so team members can add links to other relevant information and the PM can update the proposal as necessary. With everyone more or less agreed on the background, the next step is to sketch a plan for the release.
Step 2: sketch out a release plan (the “who” and “when”)
The next checkpoint is to establish what it will take to get this feature out to customers and when you expect to release it. Deliverables at this stage are as follows:
- Define the team. Who’s going to design it, build it, market it, and support it?
- Articulate the goals and non-goals. What will you do? And equally important, what won’t you do?
- Build a roadmap. How will you achieve those goals?
You should include all of this on your release planning page to serve as a constant reminder to yourself and your team, and as an easy reference for others interested in your project. Your page might look something like this one:

Lots goin’ on there. Let’s break it down.
Team
We write out the team in a table, with different sections for the many functions that work to ship value to customers, from developers to marketers to QA and support. This ensures we don’t forget anyone, reminds the PM to check in with the relevant product marketer and identifies the developers a support engineer should reach out to for more information about a bug (but we never ship bugs so this is not a concern 😉 ). We add each person’s profile picture to help working with a distributed team feel more personal, especially if we haven’t met in person.
Goals and non-goals
Next, establish what your goals are, as well as related items that you have decided not to solve for in this release. This clarifies the focus and helps you avoid scope creep. It’s as easy as listing off a few bullet points – no need for any fancy formatting here. Just make it clear, concise, and near the top.
Roadmap
Once you’ve set out the background, proposal, teams, goals and non-goals, sketch a project roadmap. This serves a few purposes:
- You get an instant sanity check. Visualizing the streams of work in a proposed timeline will help you see whether accomplishing your goals in that time frame is realistic
- Priorities are clear. Establishing the order in which larger streams of work should run helps your team understands the priorities and flow of the project.
- Communication is self-service. Stakeholders get a high-level overview of the release’s timeline without having to swing by your desk.
You can do this on a whiteboard or with sticky notes and take a picture, but we like to use a roadmapping tool in Confluence that allows for quick and easy changes to the roadmap, plus the ability to link roadmap items to pages with additional background. We also like to put the roadmap on our main planning page for easy access as it communicates the rough timeline of the release to anyone that visits. (Note: This simple roadmap is purely for sketching our plans. We turn to Portfolio for Jira to see if we can deliver on our plans given our resources.)
At this point, you’re ready to share the high-level plan with your team, the product leader, and other stakeholders for feedback. Ask them to poke holes in your plan and suggest improvements. Are you solving the right problems in the preferred order? Is the roadmap realistic? Do you have the right team? Go through a few iterations and update your goals and roadmap accordingly.
Step 3: translate ideas into action (the “what”)
Once you have high-level agreement on your plans, you have to make it actionable. This means writing product requirements for your development team to work from. We’ve written about requirements before so I won’t discuss how to write them here. The important thing is to include the requirements as part of your overall release planning so developers can easily reference them, and others can get more detail on the project if they need it.

We write a simple product requirements document and connect the requirements to user stories in our issue tracker. Again, ask for feedback at this stage. It’s simple to leave comments on particular requirements asking for clarification or suggesting improvements. Requirements are automatically linked to issues, which gives developers a quick path to extra context if they need it, but doesn’t clutter their scrum board with unnecessary detail. On the flip side, the status of each issue updates automatically in the product requirements document so the product manager stays up to date on each feature without having to pester the devs or run reports. It’s self-serve on both sides, and it saves us time and confusion.
Step 4: cancel your status meetings (w’hoo!)
Spend time on the first three steps and you’ll have a set of planning pages that present your project at a high level, with the background and purpose a click away. If anyone really wants to get into the weeds, links to the project’s epic and individual issues are all right there.
Running through this flow helps you clarify your project so you make sure you’re building the right thing in a way that makes sense. You’ll save time and headaches along the way for yourself and others on your team.
- Product & development managers have all the release details in one spot so every angle of the release is accounted for.
- Developers have all the resources they need – background, product requirements, designs – connected to their issues so they can dig in and start coding.
- Stakeholders get a high-level overview of the project and its status from your page.
It takes some time to change the instinct to send an email or IM every time a question comes up, but once people figure out they can get all the answers they need from one central resource, they’ll stop bothering you for little questions and weekly status updates.
More release planning from the “oldies-but-goodies” vault
If you’re still planning projects with a slew of disconnected text documents and spreadsheets, depending on email and meetings for every single question and status update, you’re (over)due for a change. We demonstrated how to put everything described in this blog into practice in a 2015 webinar, “Define and plan great products with Jira and Confluence”.
Technology moves fast, but the principles of good release planning are timeless.