
“Knowledge un-shared is knowledge wasted.”
– this really smart guy I work with
I mean it in the most respectful way possible when I say that we software makers are inherently lazy. Else, why would we choose careers making computers do repetitive tasks for us? It’s this laziness that also motivates us to continually improve the way we work and the products we make – we want life to be easier for both ourselves and our customers.
But learning and improving is really hard if you have to learn the same things over and over again. Even the ancient humans knew this, so they got into the habit of writing stuff down (proving that software makers don’t hold a monopoly on strategic laziness). Fortunately for homo modernus, we can skip the carving of stone tablets and use Confluence instead.
As software makers, we rely heavily on sprint retrospectives and demos to learn more about what’s going on with our team and our products. Read on to see how to build pages that record what you’ve learned and let you share it outside your team.
Sprint retrospectives
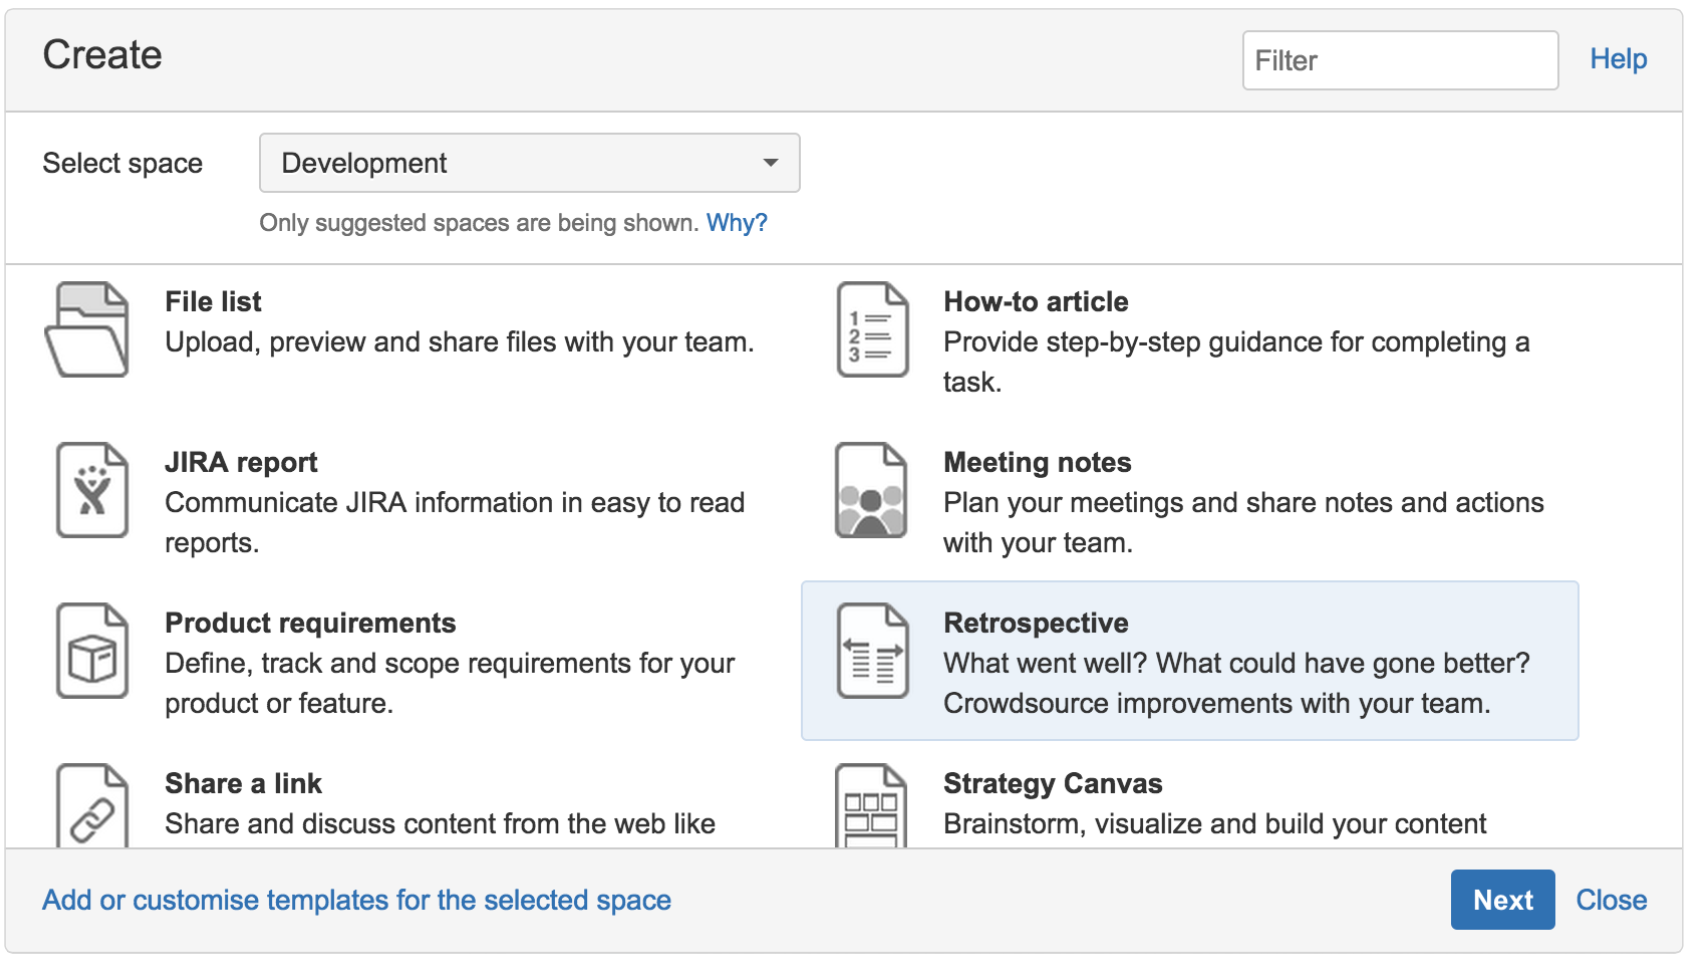
Confluence gives you a big leg up with the Retrospective Blueprint. If you’ve never used a blueprint before hit the ellipsis next to the Create button at the top of the screen, select Retrospective, then hit the Next button. You’ll be prompted to choose a title for the page and indicate which team members participated – they’ll be @mentioned on the page, which means Confluence will share the page with them automatically.
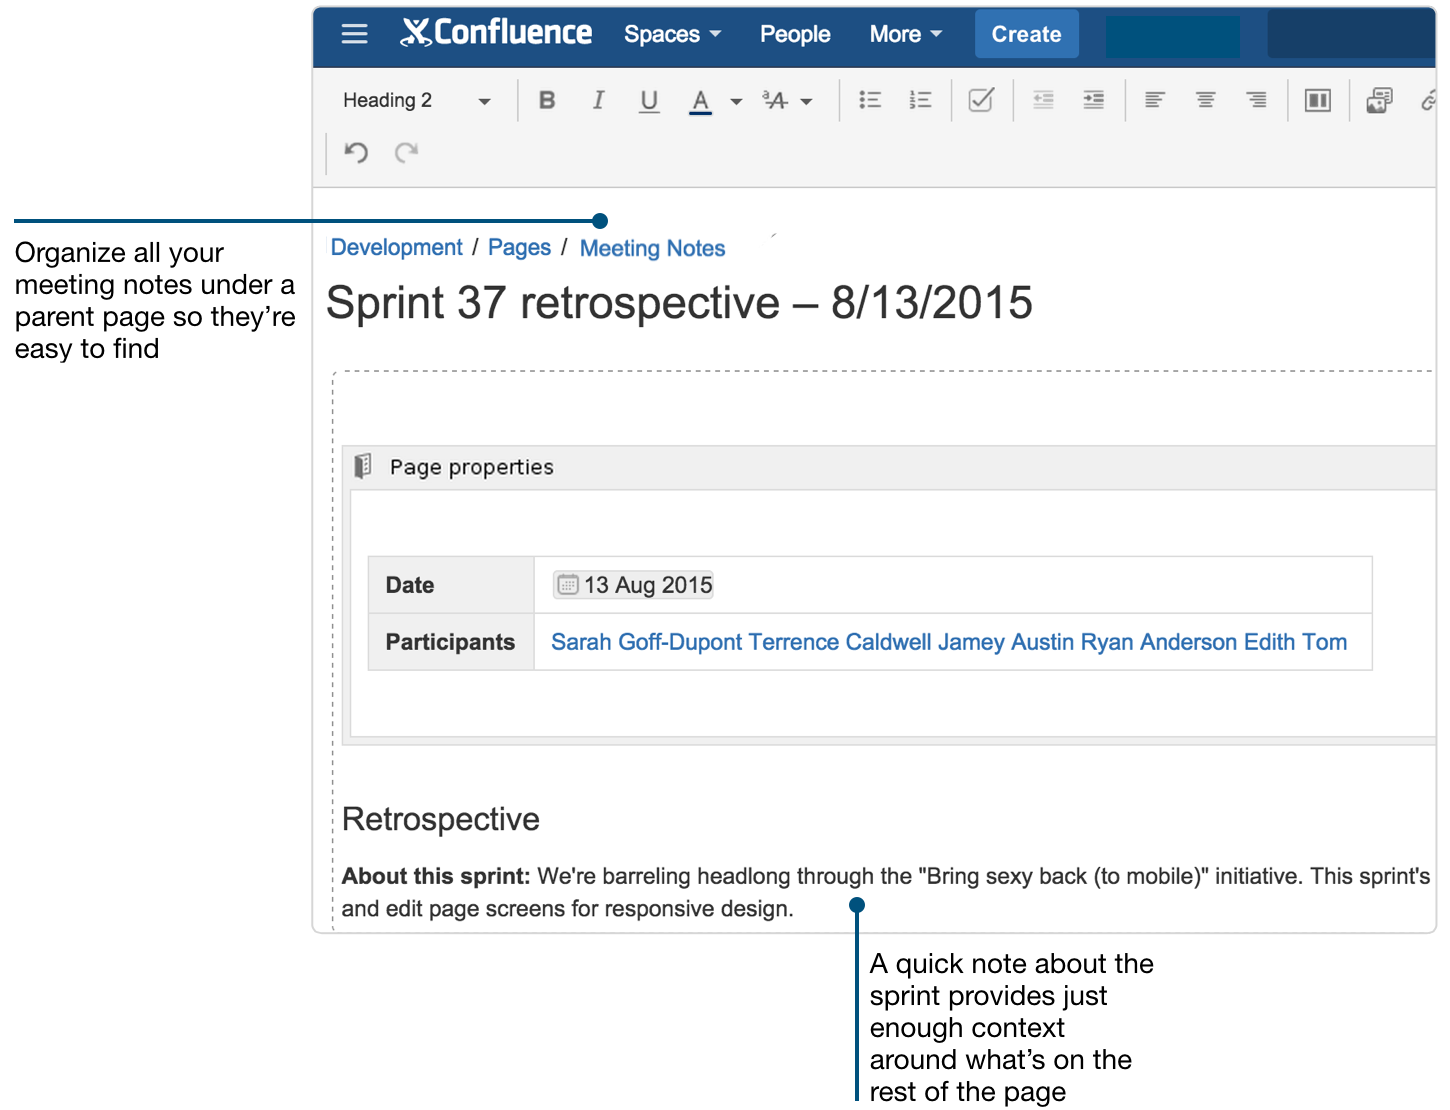
Once that’s all set, click the Create button at the bottom of the dialog to fire up your new page. You’ll notice that the blueprint divides the page into sections with different layouts – full-width for the top and bottom sections, and a two-column layout for the middle one.
Set the stage
Although the blueprint doesn’t call for it, I like to add a sentence or two describing what our focus was for this sprint to help jog our memories when we come back and look at the page a month (or year) later.
Capture your ideas
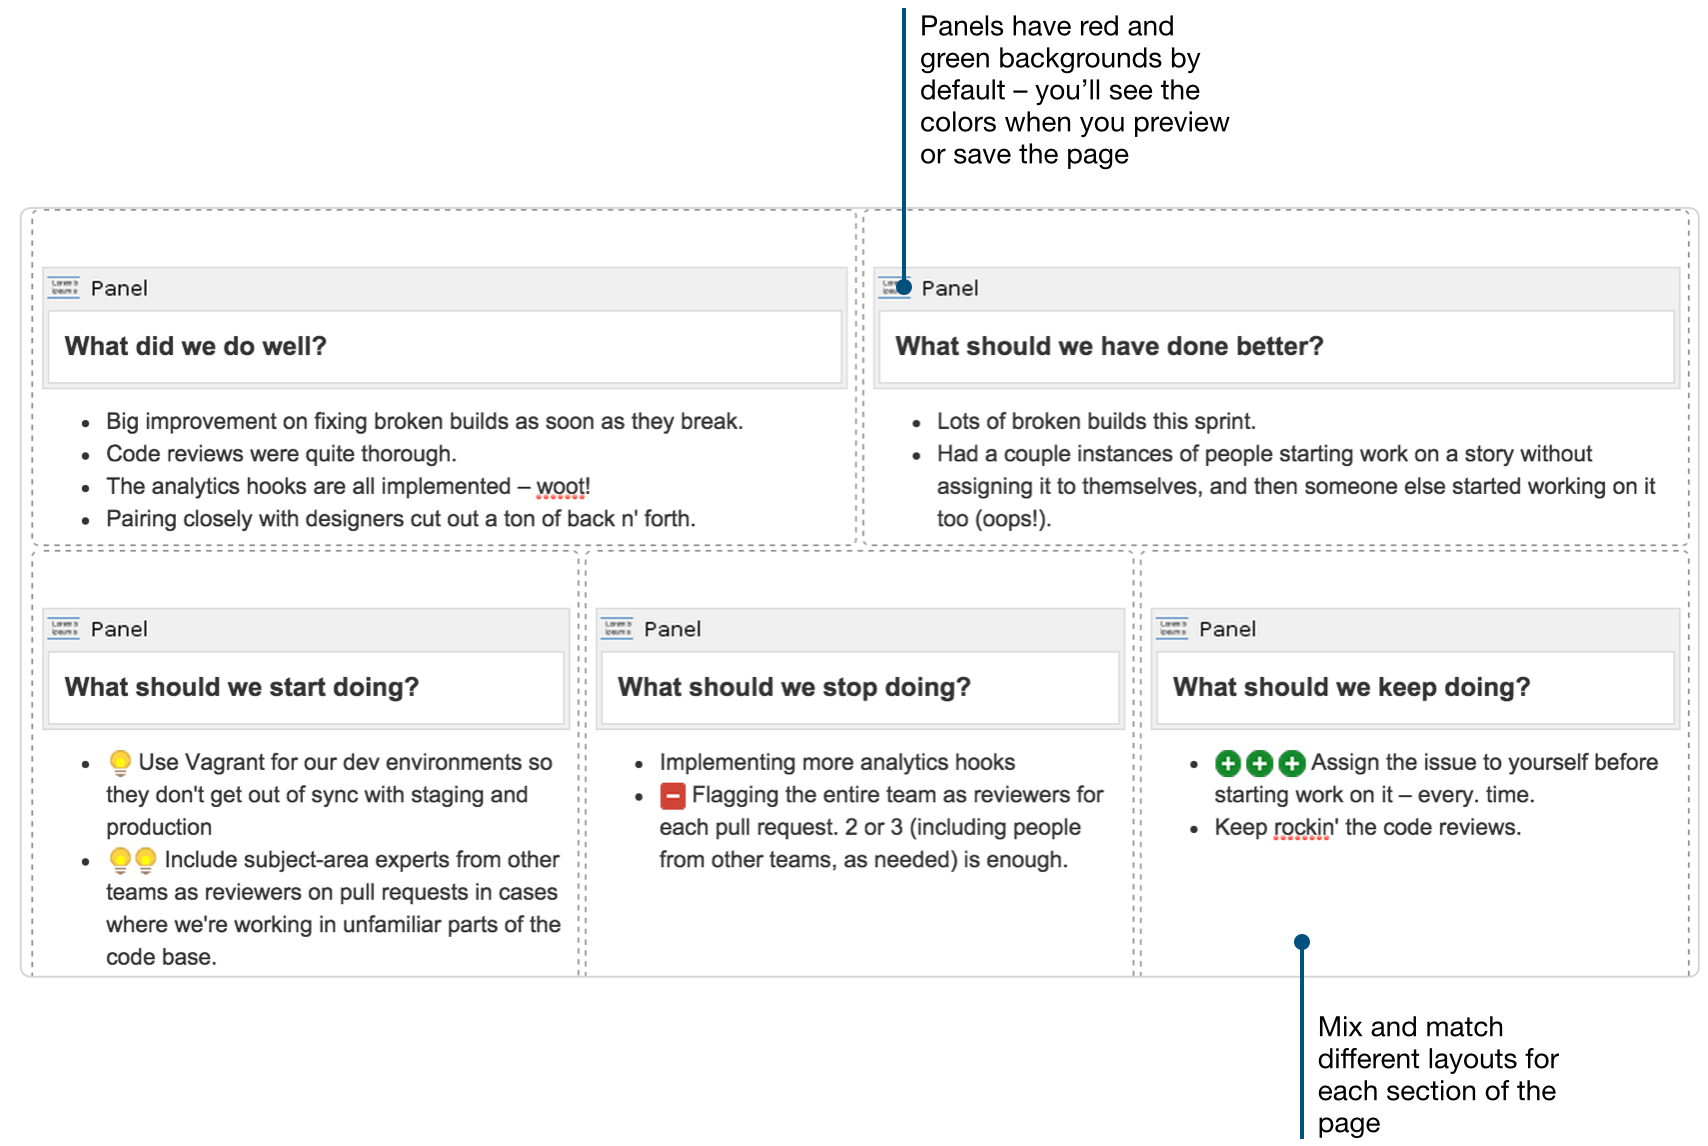
The Retrospective Blueprint defaults to a “what went well / what didn’t go well” format, which allows the whole team to help translate one person’s feedback into actionable tasks. If your team is more experienced, you can easily adapt the blueprint to use a “start / stop / continue” format – either instead of or in addition to the default sections provided.
To split that section of the page into three columns, place your cursor in one of the two existing columns, click the Page layout button in the editor, and select the three-column option. Then copy the contents of an existing column into your new third column and update all three headers appropriately. And if you use both mechanisms in your retrospective, add a new section to the page by clicking the Page layout button, then Add section, and choose the three-column layout for the new section.

Now you’ve got an easy way to capture and categorize the things you and your team discuss. But how do you know which are the most important points – the ones you want to make a priority in your next sprint?
At Atlassian, our teams put it to a vote. Each team member gets to up-vote 3 items in each category, which we represent with an emoticon placed next to the item. Here are some suggestions:
-
") – keystroke is (+)
– keystroke is (+)
-
") – keystroke is (-)
– keystroke is (-)
-
") – keystroke is 🙂
– keystroke is 🙂
-
") – keystroke is 🙁
– keystroke is 🙁
-
") – keystroke is 😛
– keystroke is 😛
-
") – keystroke is (y)
– keystroke is (y)
-
") – keystroke is (n)
– keystroke is (n)
") – keystroke is (on)
– keystroke is (on)
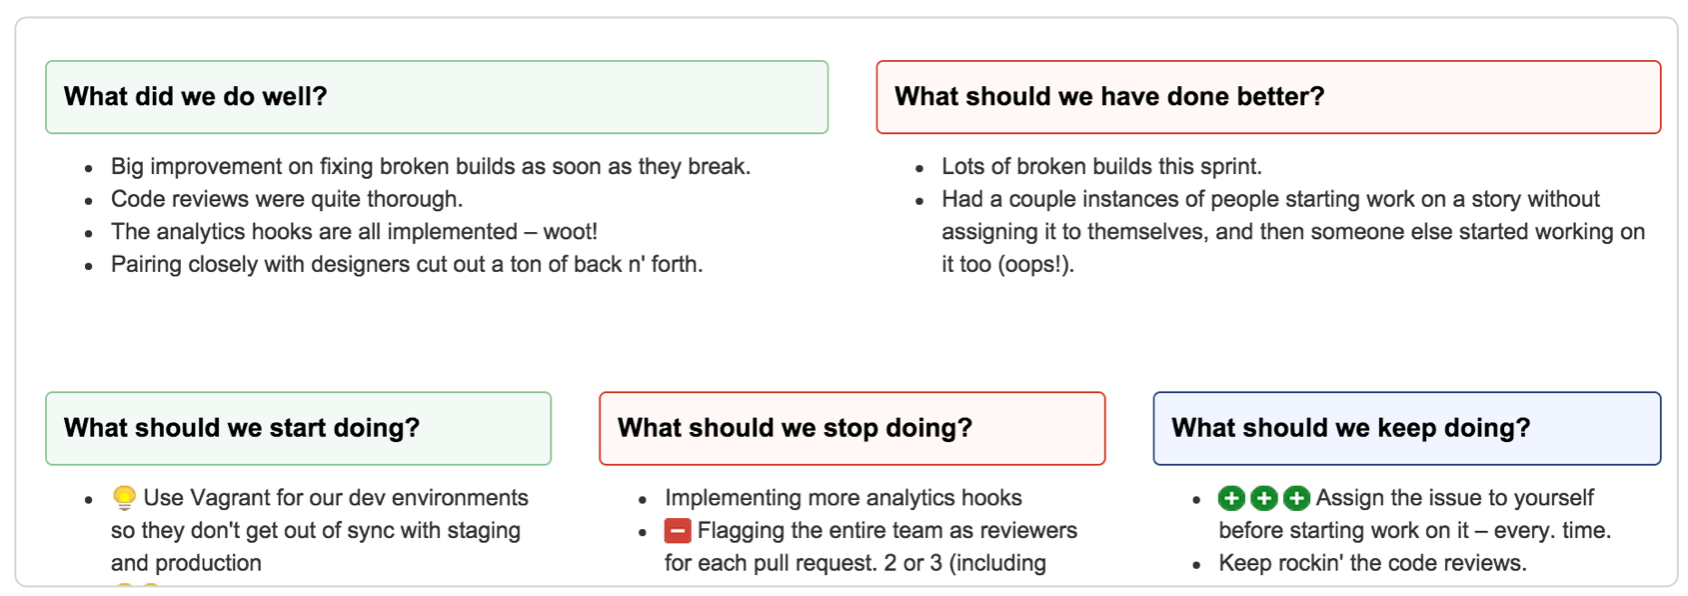
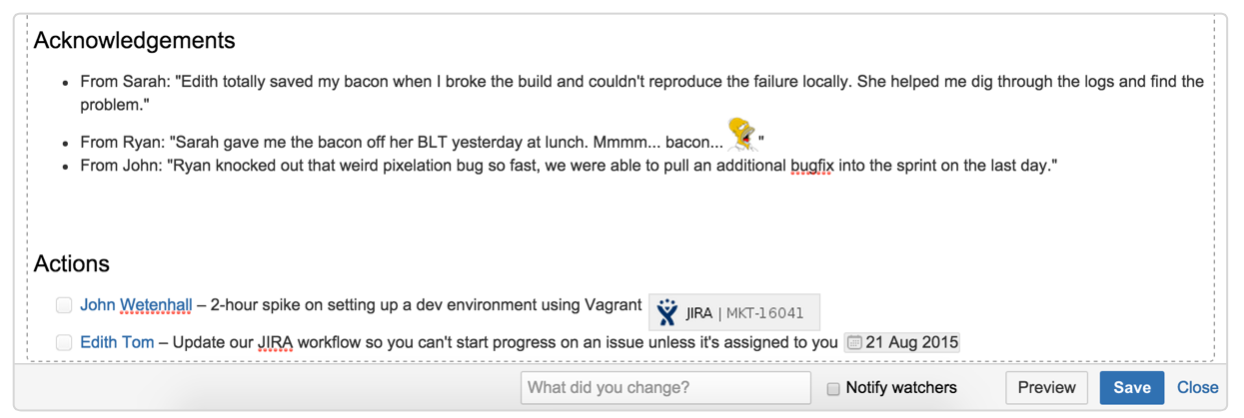
Once you save the page, those panels will look something like this:
End on a high note
Another habit of highly-successful teams is for team members to acknowledge each other for the good deeds they did this sprint. (Note: managers are barred from giving or receiving acknowledgements – this is meant to be strictly peer-to-peer.) Above the “Actions” section created by the blueprint, type “Acknowledgements” and format it as a section heading by clicking on the Paragraph menu, and selecting Heading 2. Underneath, transcribe the kudos your team gives each other in a bulleted list.
Finally, don’t let your great ideas go to waste – take action. The blueprint adds a section for this automatically and gets you started with an empty checklist. Three formatting features come in really handy here:
-
- @mentions – so you can flag a team member as owning each item
-
- Dates– so you can set deadlines for following up (type // to bring up the date picker)
- Jira issues macro – so you can see the progress of larger action items (type { then Jira to create a new issue without leaving Confluence)
Sprint demos
You’re probably thinking “Huh? Pages for sprint demos?!” No worries – we tend to think of demos as happening live and in the flesh (or at least in real time). But for distributed teams, that’s not always possible. (And let’s face it: distributed teams are as ubiquitous in the software world as Elvis is in Las Vegas.) So when you can’t get everyone online at the same tie, recording demos using screen capture tools like Camstudio or Jing and embedding the videos on a Confluence page is a great substitute for doing it live.
More fun with page layouts
Start by creating a good old fashioned blank page and give it a sensible title that’ll make it easy for team members to find through Confluence’s quick search or by browsing your team’s space. For example, you might create a parent page called Retrospectives, then child pages underneath for each sprint’s retrospective notes.
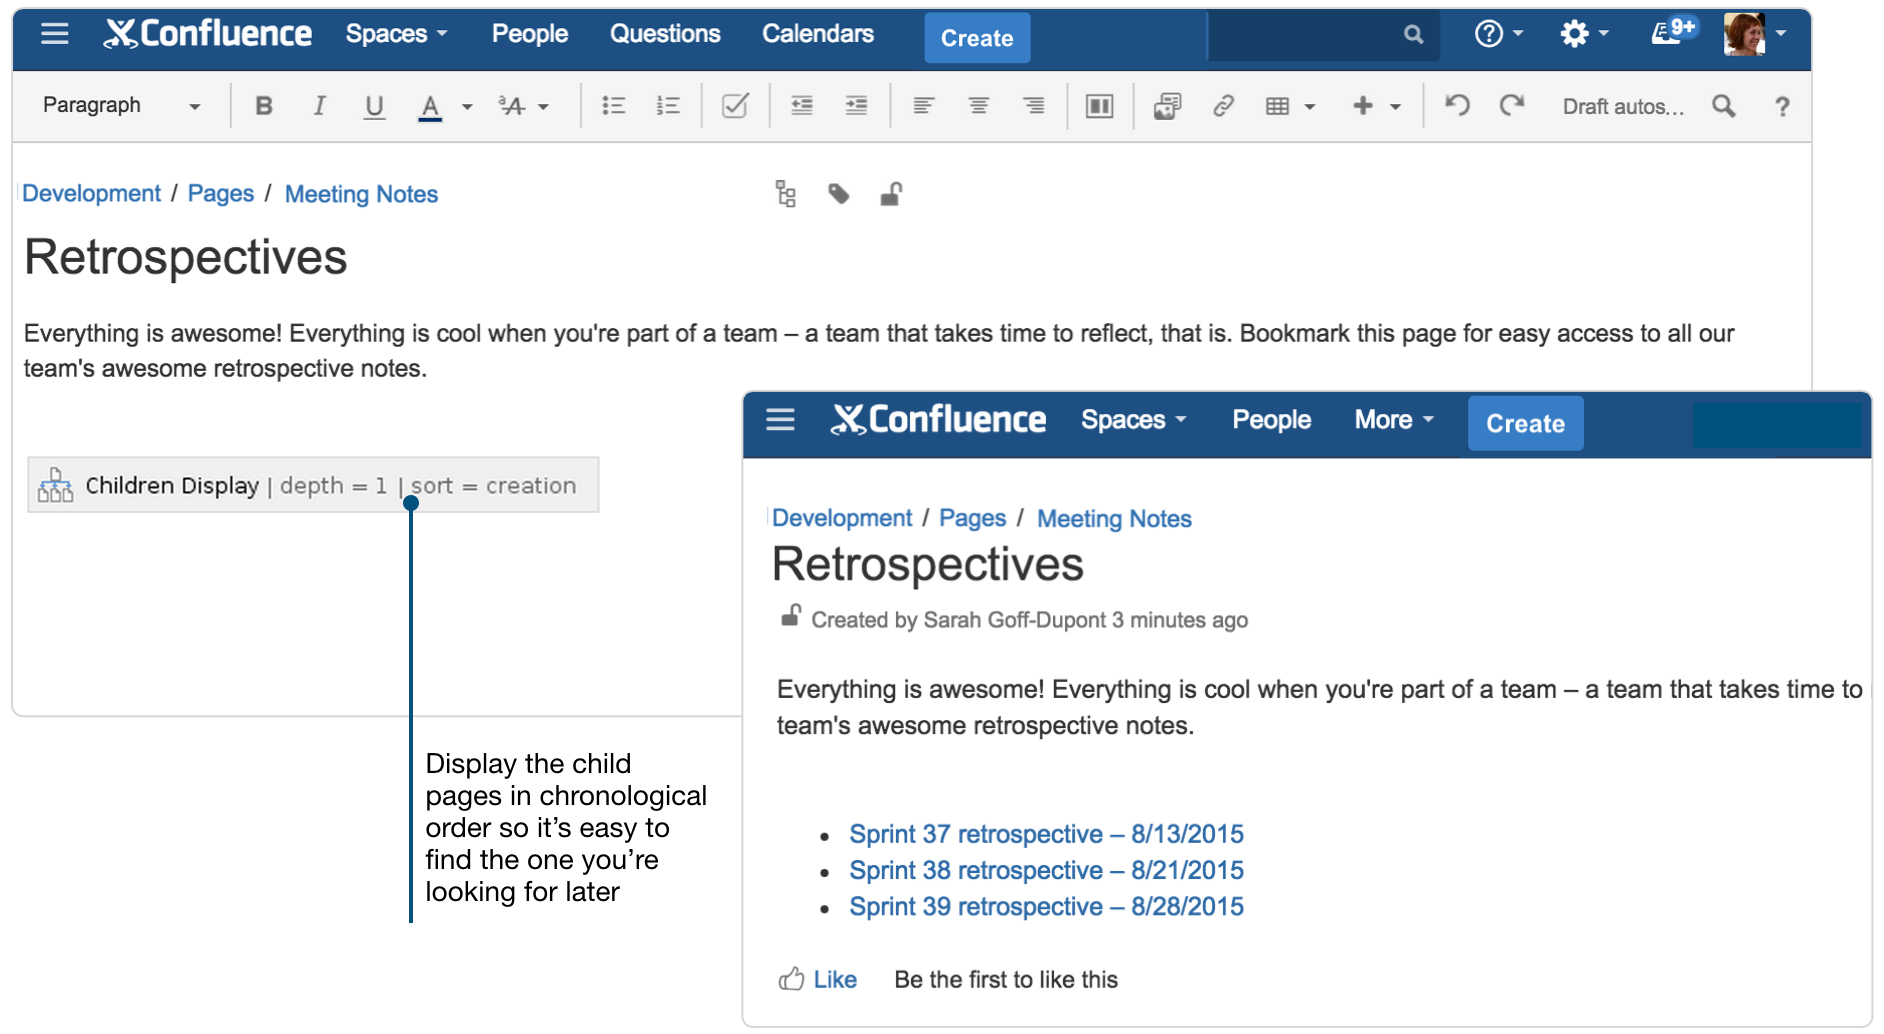
Bonus points if your parent page uses the Children display macro (which does not actually crawl Facebook and display pictures of your children on the page – because that would be creepy). Anyway…
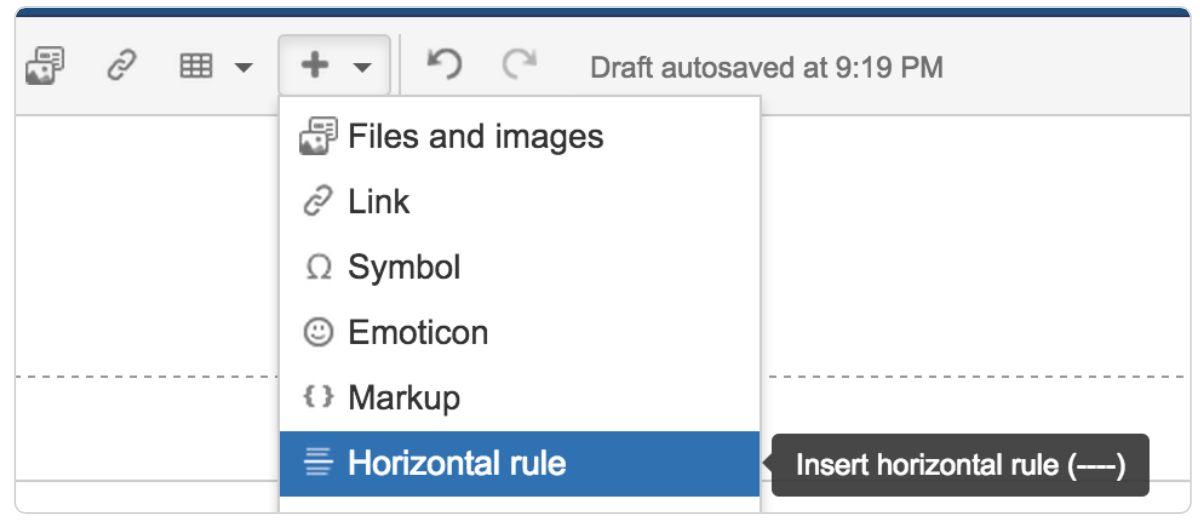
Wherever you choose to create the page, you now get to use your new friend, the Page layout button, to add sections for each office or locale. I like to use a full-width (single-column) section for the headings, and insert a grey line that extends all the way across. To add it, go to the Insert more content menu and select Horizontal rule.
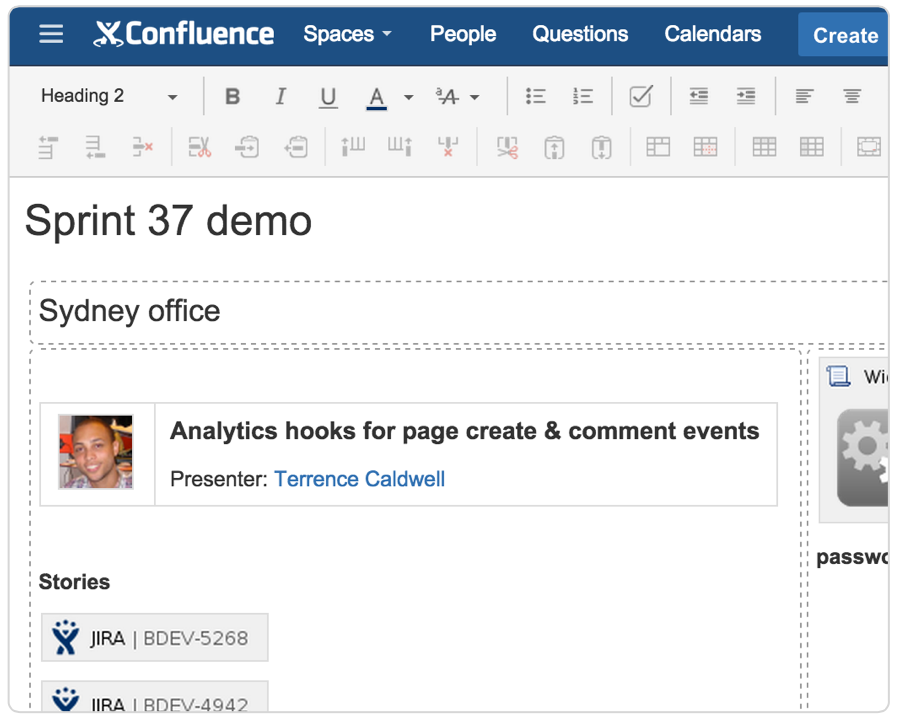
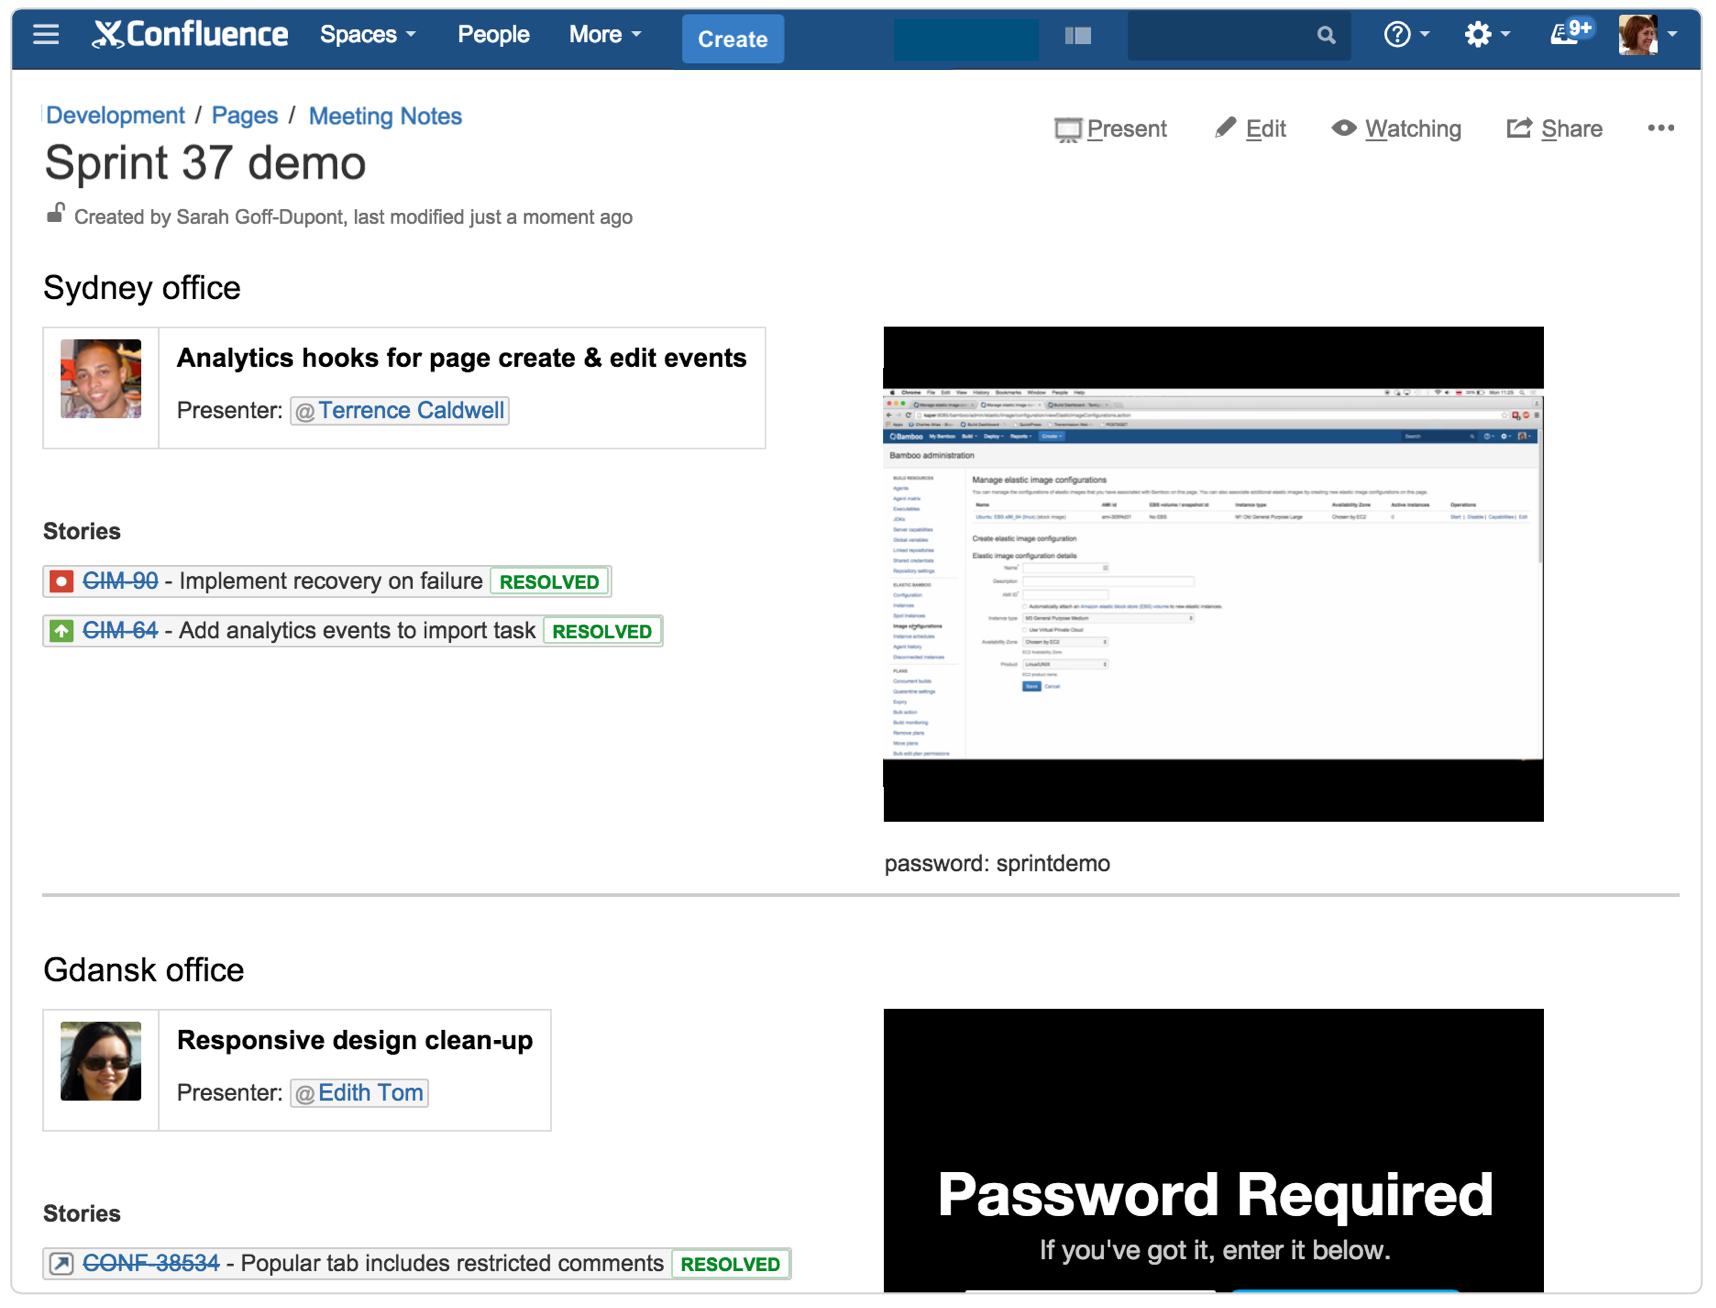
For the sections containing the demos themselves, use a two-column layout to keep the page’s content compactly organized and easy to read. In the left-hand columns, insert a table to hold information about who is presenting and the theme of their demo. Below that, embed the relevant Jira issues using the Jira macro, or simply by pasting in the link to each issue, as I mentioned above.
Fun with video
Over in the right-hand columns, ask each team member to embed their screen captures using either the Widget connector or Multimedia macro. Both are available from the Insert more content menu – choose Other macros at the bottom of the menu to bring up the macro search and selector screen.
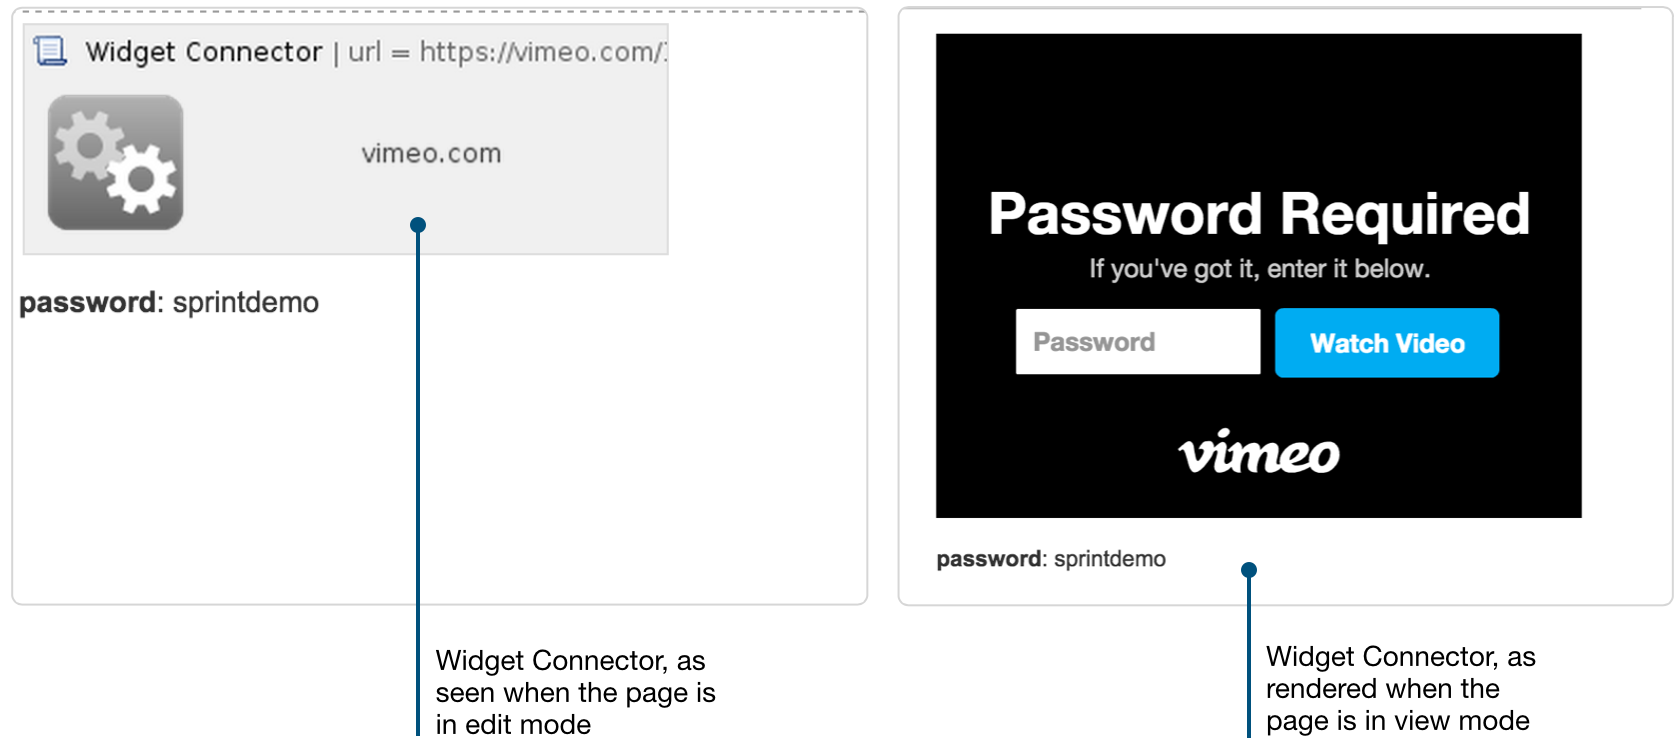
Once you’ve save the page, it’ll look something like this:
At a glance: what you just learned
We’ve covered a lot of ground here: blueprints, and page layouts, and macros (oh my!). Here’s the highlight reel.
- Retrospective Blueprint: It does most of the work for you. Just fill in the blanks, add optional sections for acknowledgements and sprint overview, and hit Save.
- Page layouts: Divide all or parts of your pages into one-, two-, or three-column layouts to make your pages look even more awesome. Careful, though: this feature is highly addictive!
- Jira links: Paste in a link to your Jira issues, or pull up the Jira macro to search for them.
- Profile picture macro: Because your team mates look great in pictures.
- Widget connector macro: Paste in YouTube, Vimeo, Twitter, or SlideShare links, and this macro will make your content look great on the page.
- Multimedia macro: Use this to upload .mp4 video images directly from your computer. Or .mp3 files if you care to provide a soundtrack for demo viewing
")
This post is part of our latest collection, A Software Team’s Guide to Confluence. Click the lovely green button below to see the rest.
In the spirit of “knowledge un-shared is knowledge wasted”, if you found this article helpful, please share it on your social network of choice so your fellow Confluence users can create killer pages too!