
I’m a Technical Account Manager (TAM) at Atlassian. We’re your single interface to Atlassian’s support, product, and engineering teams, helping escalate issues and advocate on your behalf. TAMs are also a trusted resource for coordination between Expert Partners and your IT or DevOps teams for implementation needs. A TAM is your business partner to help you succeed at scale and reap the most from your Atlassian investment.
On the Technical Account Management team we get a lot of questions and give a lot of tips on how to manage Atlassian applications at scale. Administrators have the tough task of managing change across all of the applications they manage. They often have to find answers to questions like:
- What’s the impact of updating Java, my database version?
- Would moving a sever to a different subnet break my application?
- What’s the impact of upgrading one of Atlassian’s applications?
Software teams have long benefitted from using a smoke test to quickly validate a new software build. The smoke test is designed to verify basic functionality and the most common problems that appear in the product. Using a structured smoke test makes managing change across your Confluence instance much easier as it’s an easily reproducible test any administrator can perform. In this article we’ll cover how to use the admin tools to verify integrity, how to generate a good content test bed, and how to run those tests.
Ensure everything’s good under the hood!
The first place to validate any major change to Confluence is in the Confluence administration section. It offers five key features administrators can use to validate that Confluence is running well.
- Atlassian support tools – The Atlassian support tools offer two important features: health check and log scanner. The health check validates that all the system requirements have been met. The log scanner scans through the server logs looking for known issues and suggesting solutions for any common use cases.
- Search index – The content index, also called the search index, drives Confluence’s search functionality. After any major migration, it’s good practice to rebuild the index. Don’t forget to check the “queue contents” to check for any unsightly buildup! Always rebuild the index when usage of Confluence is low.
- User directories – If your Confluence instance is connected to Crowd, Active Directory, or LDAP, always check the date of the last directory sync. Often times network changes catch the Confluence administrator unaware when the connection to the directory server breaks.
- Add-ons – Add-ons bring new features to Confluence. Always check the manage add-ons page for any incompatible add-ons, expired licenses, or new versions to install.
- Cache statistics – The cache statistics page highlights inefficient caches that highlight when Confluence is not performing its best. If you’re seeing lots of red, check out Performance Tuning for more information.
Validate Confluence with a solid smoke test
So far we’ve looked at how to use what’s inside of the Confluence administration section. The next best investment a Confluence administrator can make is to create a test space with representative content across your Confluence instance. This test space serves as the proving ground for the smoke test used in upgrade testing, platform migrations, and new add-on testing. It’s a small up-front investment that will pay rich dividends by validating changes to Confluence easier. Remember, something is better than nothing. Start small and modify your smoke test over time as you learn common pitfalls.
Decide which content to include
The test space should represent content across a your Confluence instance. We’re looking to do three things: validate Confluence is operating properly, quickly spot any data integrity issues, and ensure changes don’t have unexpected consequences.
At a minimum, we recommend including:
- Use case: validate Confluence is operating properly
- a simple page with only text
- a simple page with text and images to test for attachments
- a page for each add-on installed from the Atlassian Marketplace
- Use case: quickly spot data integrity issues
- the pages above, plus
- a page with international characters representative of your Confluence instance: Latin1, Cyrillic, as well as any double byte languages used within your instance
- Use case: ensure no regressions occur when making changes
- any pages that users report chronic problems
- any unique pages that customers report as performing poorly on load, edit, or save
Create your test space
We recommend creating a test space and adding all the test content to that space. You may be thinking, well, “I can maintain a list of URLs that refer to key pages in my instance, right?” You can, but you don’t own the content in those pages. Users move and change pages. Pages that showed a performance issue at one point may no longer reproduce that use case as the makeup of the page has changed. When building content for the test space, create a copy of any pages throughout your Confluence instance that are relevant.
As a Confluence administrator, it’s important to include add-ons when designing a content proving ground. Users of Confluence often ask administrators, “Hey, can you install plugin XYZ?” The Confluence admin then installs the plugin and then often doesn’t know how or why it’s used in the instance. It’s easy to use Confluence’s search function to find example pages. Let’s look for the add-on Gliffy.
https://confluence.you.com/dosearchsite.action?queryString=macroName%3Agliffy*
Organize your test space
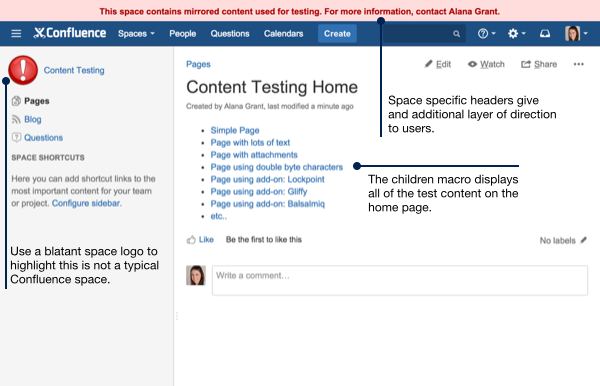
As a best practice, use the page hierarchy within Confluence to organize content using the categories above as a starting point. This will help more efficiently test content in the test space. Then, use the children display macro on the homepage of the space to list out all of the test content in one place. See the main text area in the image below.
Once you have more than a few test pages, you may want to have some hierarchy in your test suite. Use Confluence’s reorder pages function to organize your content. For each new category, create a new blank page with the children macro much like the home page. Place the associated test pages under that category page.
Style your test space
The other customization we have in this space is a space-specific banner. To create the banner, we use some simple CSS in the look and feel section of space administration. Choose a color scheme that provides high contrast from the Confluence header in your instance. We want to make it clear that this section is for testing only. We don’t want team members making changes to the test content thinking it’s the real thing.
#header::before {

content:"This space contains mirrored content used for testing.

For more information, contact Alana Grant.";

font-weight: bold;

text-align: center;

color: #A00;

background: #FDD;

display:block;

padding: .6em 0 .4em 0;

}
Secure your test space
Lastly, set the permissions of the space so that only administrators and those involved in testing Confluence can see the space. This will prevent the test content being shown in search results for most of your Confluence users.
At this point, you should have a pretty good feel for what types of content would make a good test bed in your Confluence instance. Remember, don’t create new content. Focus on copying existing content already within your Confluence instance. In our next installment we’ll talk about how to use this test space to troubleshoot and address any performance problems within your instances.
Documenting the smoke test
It goes without saying, but document how to run your smoke test. Let me say it again. Document your smoke test. That simple step will save a new administrator many headaches when managing an incident in the absence of the primary administrator. Link to this document if you need to remind the team about why it’s important.
The documentation doesn’t need to be extensive, but it needs to be authoritative. Start with something simple like:
- Validate administrative controls
- Atlassian support tools – Health Check and Log Scanner
- Search index – If users are reporting problems with search, rebuild the index during off peak hours. Also, check the queue contents screen and ensure there’s not any backup.
- User directories – Verify that the last sync has happened in X time (based on your sync interval).
- Add-ons – Check that no add-ons are expired or reporting other errors.
- Cache Statistics – If Confluence is performing poorly, check this page and engage Atlassian support.
- Validate test pages
- Go to the Content Testing space (URL: http://confluence.you.com/display/CONTTEST)
- Run each of the pages under the smoke test section to verify:
- Each page loads without error
- Success criterion is met
When the first draft of the documentation is complete, have someone else run the smoke test. A second set of eyes will bring a new perspective to the documentation!
Automating the smoke test
The next step is automating the smoke test. Automated smoke tests can be run continually to verify server uptime and supplement standard server monitoring. Several technologies exist that can pair with the smoke test:
- cURL to validate the page returns a HTTP 200
- Selenium to validate the content and quality of pages
- https://github.com/jnicklas/capybara – A ruby webdriver dsl. Easy to write up tests!
- http://casperjs.org/ – a Javascript library that uses PhantomJS
Whichever one you choose will pay dividends down the road. One tip, though, break things in your test instance so that you can see your test of that use case fail. 🙂
So there you have it. Managing change doesn’t have to be scary. A smoke test makes managing Confluence an easier and more agile experience. System administrators, what other tips do you employ to make managing change easier?
Let our TAM team help you get the most out of your Atlassian applications.