
This is a guest post by Tobias Viehweger, cofounder at yasoon, creating awesome Outlook apps for everyone.
In most organizations, email is still the preferred medium for communication. And when we are talking email, Microsoft Outlook is the go-to tool.
In a software development setting, it’s a common requirement to transfer information from emails to Jira Software, Jira Core, or Jira Service Desk. Have you ever wondered “Is there is a faster way to create a new issue?” Or “How do I work with the Jira Software notification emails?” These four best practices will answer those questions and show you how to get the most out of using Jira Software and Outlook together. (Note: I’ll be talking mostly about Jira Software, but these tips apply to Jira Core and Jira Service Desk as well.)
Best practice #1: create Jira issues via email
Did you know that Jira Software already offers an email integration out-of-the-box? It’s called the “incoming mail hander” and can be used to create new issues or add comments to existing issues. Using this is as simple as sending an email to the address of your Jira system. For cloud systems, the default is: jira@mysystem.atlassian.net.
The mail handler needs to be configured by a Jira administrator and, once set up, it will work for every product. You just need to know the following basics to get started.
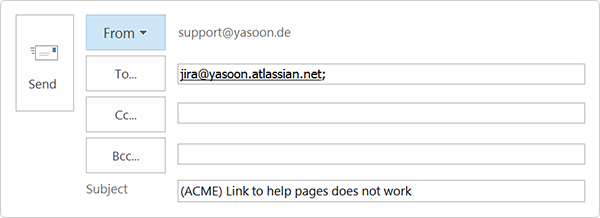
Creating a new issue is probably the most common use case for integrating Jira Software and Outlook. A customer sends a bug report and you need to enter this into Jira Software to make sure it’s tracked and prioritized by your development team. To do this, you can forward your customer email your Jira email address. The subject will be used to determine the title of the issue. For example, using the following subject line will create a new issue called “Link to Help Pages do not work” in the project that is configured for this mail handler.
Pro tip: Make sure to remove all unnecessary text from the subject and the email body, like the “FW:”-prefix.
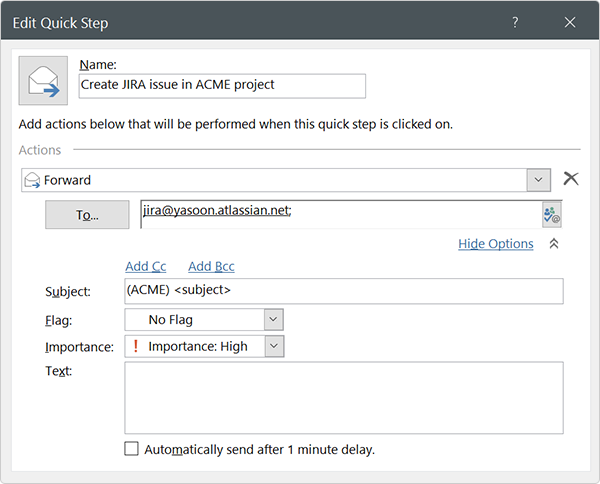
And to create issues even quicker, you can create a new quick step in Outlook. To do this, click Create New in the Outlook quick steps area. Give your new quick step a catchy name and enter the Jira email address. Make sure to keep the “subject” part. You can also specify a default importance setting, which will be used to set the priority of the new issue in Jira.

Commenting on existing issues works pretty much the same as creating issues. Just prepend the issue key to the subject. Jira will take care of finding the correct issue and add the email text as a new comment. Neat, huh?
Best practice #2: tune down Jira email notifications
Jira Software can send a lot emails if there are a lot of active projects with lots of issues. When participating in such high volume projects, it’s easy to lose the overview, especially if you are receiving other emails as well.
But don’t take these emails as a given. Your project administrator can configure the notifications to be very fine-grained and to fit the needs of your team. For example, email notifications can be turned off for certain events like:
- Status changes of the issue
- Change of the issue description
- Change of assignee
In many cases, it makes sense to be informed about these kinds of changes. If you feel they are adding noise more than they are helping though, talk about saner notification settings with your friendly neighborhood project administrator.
Best practice #3: use Outlook rules to organize Jira emails
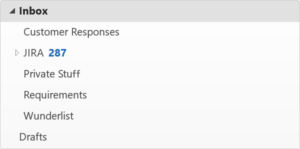 As mentioned in the previous tip, receiving a lot of emails from Jira Software is commonplace. Team members often filter these email notifications using an Outlook rule, which moves them to a “Jira” folder in their inbox. This leads to situations, where emails pile up in this folder, often unread and unnoticed.
There are, however, some best practices to get more out of Jira notifications, without any manual effort. Instead of moving all emails to the same folder, you should create one folder for each project. An “Customer Escalations” project is more urgent than planning the corporate holiday party, and you can set up rules in Outlook to help you prioritize notifications accordingly in your inbox.
Creating rules in Outlook is easy enough. In the main window, just select an email and choose Rules and then Create Rule.
In the new window, choose Advanced Configuration and configure the rule to look for the subject with this text, while replacing ACME with your project: [Jira] (ACME-

For the action, have Outlook move it to the specified folder and select your project folder. Finish off the wizard and your new rule will be active immediately. If necessary, you can repeat this for all projects.
Best practice #4: use Outlook alerts to your advantage
The last tip is for situations like when you immediately want to be alerted for certain Jira Software events. When using Outlook rules, you can use the action Display a Message in the alert window. This will show a dialog in Outlook, which you’ll need to confirm. This might come in handy, when an immediate action from you is required, like critical issues by certain clients!
So… that’s about it! Be sure to let us know about your own rules and workflows with Outlook in the comments below. And if you’ve found this post helpful, please share it on your favorite social network so your fellow Jira users can become email-handling ninjas, too!